
What you need to know before you tap maple trees to make your own maple syrup
 It looks like for many areas, it’s time to prepare for maple sugaring season. You’ll need to have a few items on hand, and understand a few basics, to be prepared to collect sap and make your own maple syrup!
With temperatures in the Mohawk Valley getting above freezing during the day, and below freezing at night, you’ve got the perfect opportunity for maple sap collection. In previous posts, we listed how to identify the maple trees to collect the sap. Now that you know which trees to tap, it’s time to take the next step–pick the right trees to tap.
Maple tree size matters for sap collection
Not every maple tree you find should be tapped to collect sap. In order to maintain the health of your maple trees, and ensure many years of safe, healthy sap collecting, the trees need to be a certain size in diameter.
According to the Cornell Maple Program Maple Syrup Production Beginners Notebook, maple trees with a diameter of at least 10 inches can be tapped. This measurement is taken at about 4 1/2 feet above the ground. Trees that are at least 10-inches in diameter can have just one tap. If you try to reach around the tree with both arms and you cannot reach fully around the tree trunk, then you could possibly use two taps.
Guide For Number Of Taps Per Tree
- Diameter (inches)
- less than 10-inches
- 10 to 17 inches
- 18 to 24 inches
- 25+ inches
- Circumference (Inches)
- less than 31 inches
- 31 to 53 inches
- 57 to 75 inches
- 79+ inches
- Number of taps
- not recommended
- 1
- 2
- 3
You can easily determine the diameter of the tree trunk by measuring the circumference or the outside measurement of the tree trunk. Simple math: diameter of tree trunk = the circumference of tree trunk divided by 3.14.
Here is an example: Diameter = circumference is 35 inches / 3.14 = maple tree diameter just over 11 inches. This tree is good for one tap because the diameter is greater then 10 inches.
Pick the Healthy Trees
Healthy maple trees will have a large, broad canopy of leaves with healthy branches and twigs. At this time of year when you look up into the tops of the trees, you won’t see any leaves, but you can see a wide spread of branches, and the sharp points of future buds. This indicates the tree will have a wide thick canopy of leaves once springtime arrives. There will be few if any broken or damaged branches, and the trunk should not have substantial injures to the bark. Other things to look for are broken or rotting sections or branches and large open wounds on the trunk bark that appear to be getting worse and not better. If there are wounds to the bark or trunk, they should already show obvious signs of healing and repair. If the tree does not look like it is vibrant and healthy don’t tap it–the sap will likely have an off flavor.
Simple low-cost way to start collecting sap
We found the easiest way to get started was to order a few taps along with “drop line” tubing. There are maple sap starter kits available online that might be helpful. (CDL offers some buckets and a starter kit here or you can get something similar at other suppliers.)
What you need to tap trees and collect sap
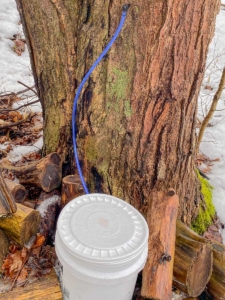
For our example, here’s the details of what we use to tap trees and collect sap to make our own maple syrup. We use taps and drop lines to collect sap into buckets. There are several different ways to tap maple trees and collect sap, but we find this method the most flexible and cost effective for us.
Here is what we needed to tap our maple trees:
- taps and drop-line tubing with one set for each tap you plan to install,
- cordless drill,
- 5/16” drill bit,
- mallet, and
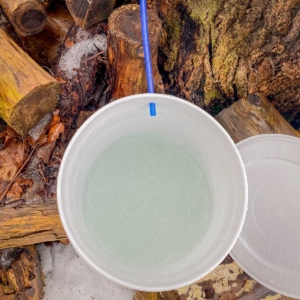
- 5-gallon food-grade buckets with a secure lids for each tap’s sap collection.
 Once you have your supplies, you’ll need to drill a hole for each tap using the 5/16″ drill bit, going no deeper than 2″. Then gently insert the taps into the drilled holes using the mallet. The short tubing is for the sap to run into the collection bucket. We drill holes in the side of each collection bucket about an inch to 1 1/2″ from the top of the rim to insert the tubing. We check the buckets each day to collect the sap when the weather is above freezing during the day, ideally 40º, and below freezing at night.
We found using the taps with drop-line tubing an easy and inexpensive way to begin taping maple tress and collecting sap. This helps limit spilling sap, and keeps out things like bugs, twigs and bits of bark from falling into the sap buckets which helps keep the sap clean.
How much sap to expect from each tap
According to New York State Maple, on average a tapped maple will produce between 10 to 20 gallons of sap per tap. As long as the tree continues to remain healthy it should produce sap for many years. This volume of sap will not happen all at once. This is a total amount for the entire 4-6 week season for collecting sap.
Once you collect the maple sap, you’ll likely need to store it until you can boil it down to become maple syrup.
We hope you find this information helpful. While learning about collecting sap, we have found the best resources to help us continue to improve our maple syrup making each year is the Cornell Maple Program for Beginners and NYS Maple.
Check back soon with more about how to make your own maple syrup. To see what to expect coming up on the topic of making your Own maple Syrup you can checkout our first post, Making Homemade Maple Syrup in the Mohawk Valley.
MVT Updates
 Mohawk Valley Featured Weekend EventsJuly 24, 2026 - 8:40 am
- Mohawk Valley County FairsJuly 23, 2026 - 9:00 am
- Chrome Pony Motorcycle Repair Shop Hosts Grand Opening CelebrationJuly 22, 2026 - 8:37 am
Featured Events

 image by the Farm to Table Tour
 Image provided by Schoharie County Farmers Market


 CRG to Honor “Leap of Kindness Day” with Collection Drive for Local Animal Shelters